Mocha Marble Cake


This cake is absolutely a chocolicious treat  to my readers.Over a week i got bored in my kitchen i wanted to try out something new and since its been long time i baked any stuff ,i decided to bake.And what to bake ? this question revolved my head like anything...Then what to do ? I took my recipe collections to find out something interesting and ,finally sort out 3 cake recipes .I felt problematic in choosing the right recipe.If given a chance i would go out and work in my kitchen till late night to finish off the 3 bakes ...Really...Am enthusiastic towards baking!! .As am not good enough in selecting one from three ,so i left this duty of choosing a recipe to my dear H,and he selected this recipe. Initially i was not much impressed to start making this cake,since am not much impressed towards any chocolate cake I've ever tasted I am die hard person towards Chocolates,but not a chocolate cake fan ever before that.But all my opinions turned down after tasting the final slice. Omg ...really it was so impressing and i could taste the heavenly chocolaty flavor with this final glazing too.


I became a fan for Mocha flavor from now on!!.I guess the addition of chocolate bars enhanced the taste ,rather than a cocoa powder if added.To get the original flavor of this cake ,i suggest you to go with chocolate bars.And i think this cake could go places even for special occasions.Until tasting this cake i had a mindset of marble cakes coming under the category of  tea cake,but my conclusion was misunderstood and I've changed it ,that this marble cake could be used both as tea cake and celebration process.Agree !!! Readers please excuse me of not clicking the cake slice as I didn't get my perfect marbled effect..Since it was my first attempt in trying marble cake.I will update my perfect marbled effect the next time when i make this recipe.
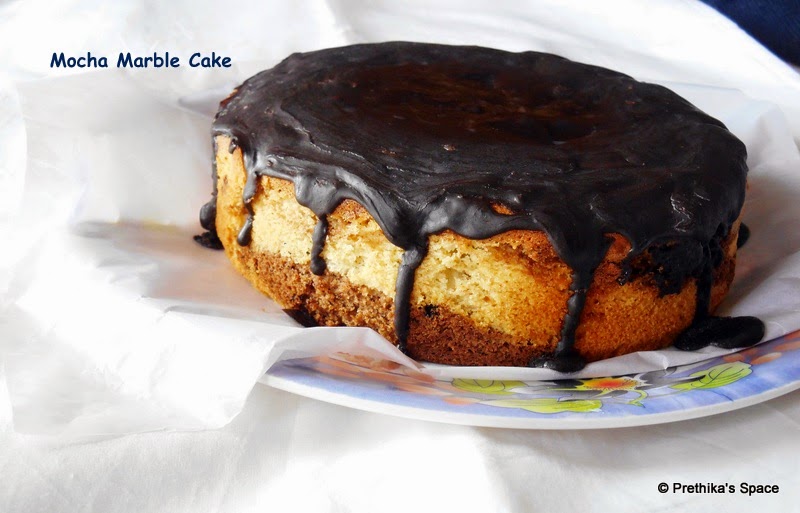


Lets look into the baking method.


Ingredients


All Purpose Flour - 1 Cup (150 gms) (My 1 Cup measured to 150 gms)
Butter (softened at room temperature) - 1/2 Cup
Castor Sugar - 1/2 Cup (heap measurement)
Milk powder - 1/2 Cup
Eggs - 2 no
Instant Coffee Powder - 1/2 Tbsp
Chocolate - 28 gm (semi-sweet or dark compound,broken into small pieces)
Baking Powder - 3/4 tsp
Lukewarm Water /Milk - 3 Tbsp
Vanilla extract - 1/2 tsp


For Chocolate Glaze


Chocolate - 60 gm (semi-sweet or dark compound,broken into small pieces)
Butter - 1 Tbsp
Water - 1 Tbsp


Method:


  • Preheat Oven to 200°C / 390 ° F .Grease the pan with butter and dust with a little amount of all purpose flour ,or place you parchment/butter paper in the pan.Sieve the flour with baking powder and keep aside.
  • In a Heatproof bowl take the broken chocolate bars along with the coffee powder,If you are using a microwave for melting the chocolate keep it 30 seconds first,at the end take them out and finely mix them break any unsolved chocolates and again keep it under 10 or 20 secondn.You should get the mocha in a running consistency.
  • Alternatively you could follow this simple method if your oven is in preheat mode.Take a pan fill with water allow to boil ,when it starts boiling place your mocha mix kept in a heatproof bowl and mild keep on mixing until all the chocolate has solved and it reaches a flowing consistency.keep aside in a warm place.Note depending on the temperature in your place the melted mocha chocolate may again get hard.so better keep it under hot water .(My melted mocha started to get hard near the edges when i was about to mix half of the batter ,so keep in note to keep the mocha mix under hot water.)
  • In a bowl add the softened butter and sugar and blend them for a while ,don't over do them ,else the butter would curdle.


  • Add the milk powder and beat for few seconds.Then add the eggs and beat them until they are incorporated,say 1minute.Remove the blender.Take a wooden spoon / ladle,Add the flour, mildly fold the flour and ensure the batter is well mixed without any lumps.If you find the Batter to be thick add upto 3 Tbsp of warm water or milk.If not omit adding water./milk.


  • Divide the batter into portions and add half of the batter to the mocha mix and bind them well.In the other half batter add vanilla essence and mix well.Take your pan ,place spoonfuls of the two batters alternatively.


  • With the help of a skewer drag through to create a marble effect.Bake in the preheated oven under 200°C for 10 minutes and at 180°C for 20 minutes.Check for the cake by inserting a wooden skewer at the center,if it comes out clean then remove the cake from the oven allow to cool ,invert the cake tin and remove the cake .Place the cake under a wire rack to cool.


  • For chocolate glazing ,place the broken chocolate bars,butter and water and keep under microwave for 30 - 40 seconds.The glaze should be free flowing.Immediately spread the glaze on the top and on the sides of the cake ,working quickly.Let it set .


  • Serve once the glaze is set.
I welcome you all to try out this recipe and leave your beloved comments in my comment box .Thank you readers.
Read More..

Potato Cheese Balls


Inspired by its name I decided to try it by myself in a simple way.I framed a picture of cheesey strands coming out of the potato balls in my mind...OMG.., my imagination tempted me more to get soon into this recipe.My process started soon,and all the things needed for making balls are ready and my cheese cubes are cut ...The one  lovely thing i liked much while making the potato chesese balls ,that's... stuffing the cheese cubes with mashed potato.I really enjoyed while covering the cheese with mashed stuff,also done it carefully.But when coming to frying stage i wanted to try it to be less caloried so i planed to shallow fry them using the paniyaram pan.This was so easy and you will get satisfied for using less amount of oil.Alternatively i tried half a portion of the balls deep frying, using the regular frying method.Compared to the taste,both tasted to be alike but personally i felt the balls fried using regular method was bit more tastier.But its left to you to choose the frying method.


 Cheese are always kids favorite at anytime and when presenting them in their most likely way ,makes them have more.This dish could be done under 30 minutes ,having all the things handy.Here i have used potato mash got from store,for reducing my work time.You can also boil potatoes,peel ,grate and mash them finely.My recipe goes like this...

Ingredients


Potato Mash - 1 Cup
Corn flour - 1/2 Tbsp
Chilli Powder - 1/2 Tbsp
Ginger Garlic Paste - 1 tsp
Grated Garlic - 1 tsp (optional)
Cheese Cubes - 6 - 8 (cut them in cubes)
Maida - 3 Tbsp
Bread Crumbs - 1/2 Cup
Salt - as needed
Water - as needed

Method


  • In a bowl add the potato mash,corn flour,chilli powder and ginger garlic paste and grated garlic and salt.If you are using fresh boiled and mashed potatoes no need to add water.If you are using store brought mash potato add upto 1/4 C water and leave it for few minutes and then manually mix all ingredients to get a dough.If you find the dough forming to be difficult add little bit of water,say 1 Tbsp at a time and mix it.Once you attain the dough make equal(small lemon size) sized balls out of the dough,Meanwhile in another bowl add maida and water to form a running consistency batter and in another bowl keep the breadcrumbs.


  • Now take each balls and with help of your palm and fingers form a small cup and place the cubed cheese and gently cover the cheese with potato dough.Once you get a ball shape ,press firmly using your palm and keep it a plate.Do it for all the remaining balls.


  • Then take each ball and dip it in the maida batter and coat with breadcrumbs.


  • Repeat for all the cheese balls.(You could store this cheeseballs after this stage in your refridgerator for a week.)Next comes the frying part you could choose anyone option to fry either using paniyaram pan or using your kadai for deep frying.Fry them ...


  • Serve with tomato sauce/ketchup.
Read More..

Uzhuntha Kazhi


Uzhuntha Kazhi is a traditional dish of tamil's.Urad/Uzhuntha Kazhi is a very good source of energy that provides stamina and strength to our bones,and it is given esp to ladies and puberty attained girls to compensate the loss occured in their body.This food is a fullfilling food ,if you have 2 medium balls of uzhuntha kazhi that will make you feel full till the next meal.Gingely oil is added while making this kazhi which gives a nice aroma and taste ,as well as healthy nutrients.


All foods like made with Urad/Uzhunthu like ladoo,payasam,kanji,rice and this kazhi gives a good source of energy to humans.Instead of preferring fastfood menu's make this simple yet a healthy food at home atleast once in a month.
There is a preprocess in making this food,its a simple thing which does not consume much of your useful time.This is nothing but getting the flour ready for the dish.Its just simple.But the only thing for you is to ,grind them in your mixer or ,approach your nearby  flour mill.But once you get them ground as fine powder ,your 90% of work is finished.Happy now... 


Lets see how i made the flour,Readers please excuse me as i didnt click pics while making this flour.Just go through my instructions you will be able to make it yourself.


Ingredients Needed for making the flour:


Urad Dal - 2 Cups
Elaichi / cardamom - 3 no's
Dry Ginger Stick - 1" inch stiick - 1no

  • Take 2 Cups of urad dal and dry roast in a heavy bottomed kadai.Roast them until all the dal has turned into golden brown color and transfer the dal to a wide plate and allow to cool.
  • Next in the same kadai dry roast the cardamom and dry ginger for few seconds and transfer them to the same wide plate for cooling.(Alternatively if you have dry ginger powder,instea of the dry ginger stick, add about 1/4 tsp)
  • If you prefer grinding in flour mill ,grind them once cooled,But if you do not have an option for flour mill nearby,no worries ,take your mixer and add the dal along with cardomom and dry ginger and grind them when they are warm enough.If you leave them completely cool then grinding would become a tedious process.So grind when they warm , grind atleast 3 times for getting a fine powder and finally sieve them and store it in an airtight container.For those who grnd through flour mill,no need to sieve the flour as it would be already fine powder.


  • You can store this flour for 2 to 3 months ,if handled properly,ie use only dry spoon/cup to take the flour.

Now its over ,next is my kazhi recipe.


Ingredients 


Serves  - 2 


Urad/Uzhunthu Flour - 1 C
Gingely Oil - 1/4 C or as needed
Palm Jaggery - 1/2 C
Water - 1 C
Coconut pieces - few (optional)


Method

  • Take the palm jaggery, pound them and add jaggery pieces to a vessel/kadai along with water and let it to boil.Once all the jaggery has been dissolved switch off flame and pass the jaggery syrup through a sieve to remove the dust and sand particles.

  • In a heavy bottomed kadai add the jaggery syrup and let it boil .If you notice your syrup to be watery allow it to boil for sometime until it has thickned.Add some gingely oil while the syrup is boiling.
  • Keep your flour ready nearby,Minimize the flame and add the flour and mix well.


  • Add oil in between stiring the flour with  the syrup,Switch off the flame.No need to keep the flame on after adding all the flour.Mix well with the wooden ladle and add the remaining oil.No need to worry of lump formation ,you will get any lumps ,some illusion like lumps will appear.Just keep on mixing until the flour has well incorporated with the syrup.Finally you get a ball like consistency ,if you didnt get such an outcome dont worry ,you can stop it once all has mixed well.


  • Close with a lid and once it reaches warm temperature .Apply some Gingely oil to your palms and make small balls out of them.Serve warm.You can eat along with coconut pieces ,it enhances the taste too.
  • Serve Warm.You can also store in your refrigerator for 3 to 4 days for reheating and consuming it.
Read More..

Coconut / Thengai Burfi


Hope many of us would have seen and tasted this coconut/thengai burfi from small/peti shops during their childhood.These burfi's remain stored in a huge glass bottle covered with a steel type of lid.I could recollect these kinda stuff ,thengai burfi ,thean mittai,javu mittai,those are memorable collections.Even still i could see these stuff's in small scale shops ,which makes me feel excited. Eventhough lots of changes happened around us ,these little stuff's remain same,which keeps me happy from a corner of my heart.I would like to share  one more thing,each time when i visit my grandma's place during my summer holidays ,its my periamma who gets this burfi esp for me from a old grandma who makes and sells it.That taste still scrolls in my mind.All those childhood events comes back when  start composing this post. I think am boring my beloved readers ...sorry ,am back to the post.


This burfi is again a simple and yummy one,once made this can be stored for a period of 10-14days and consumed,if properly handled.It means store them in an airtight container,and each time opening the bottle pick the burfi's with a clean dry hand.By this way it stays even longer.The main thing is grate the coconut using the coconut scrapper,do not put in your mixer for  getting the gratings,it will not give you the actual taste.The recipe is as follows.


Ingredients


Coconut (grated)  - 1 Cup
Sugar - 1 Cup
Elaichi - 1 to 2 
Ghee - 2 tsp 

Method


  • Grease a wide plate with the ghee and keep aside.In a pan add the grated coconut and sugar .Switch on the flame and starting stirring.


  • In some time the sugar would melt and starts combining with the coconut.Keep on mixing with the ladle.Add elaichi powder.Bubbles start to come and later it will settle down after that the burfi starts to form a thick mass ,it will start leaving the pan,i.e the burfi comes unsticking to the pan.Atlast add the ghee for flavor.

  • It is the right time to transfer the burfi to the greased plate.Group them evenly with same thickness allover the plate and allow to cool.

  • Once the burfi is half cooled using a knife greased with ghee,run through the burfi and mark slices .And when completely cool take the slices and store in an airtight container.

Tip

  • When the burfi starts unsticking to the pan transfer to the greased plate for cooing,Do not over cook ,it would turn harder.
  • No need to add water, and the ratio is 1:1 for sugar and coconut,you can double or triple the quantities.
  • Use only coconut gratings got from a scrapper.If you use mixer for getting the gratings you will loose the moisture in the coconut and the burfi would take a little longer time to reach the unsticky consistency.

Read More..

Fish Fingers


Dear readers for those who are fond of Fish fingers,here is my recipe.Fish Fingers ,are always prioritized for kids as it is less spicy ,boneless and crispy .It occupies in most of the restaurant menu.While it's simple to make at home,although lots of frozen sections have this well packed and soled.Its a wiser choice to make it at home which satisfies our heart as well as our pocket.Here comes this wonderful snack, as well as a starter.


This crispy fries are loved by all.Preparing these fish fingers are absolutely simple And once the preparation is over you can store it in refrigerator for a couple of days,some may store under refrigeration for atleast a week,but generally i don't prefer storing it for a long period.Use it as soon as possible,esp with the non-veg items.The fish fillets i have used here is basa ,which is said to be a fresh water fish.Get them cut as 3'-4' inch sticks.


Ingredients

Basa Fish Fillets - 600 gm 
Ginger Garlic Paste - 2 Tbsp
Egg(whites)- 3 No's
Chilli Powder - 1.5 Tbsp (according to the spice increase or decrease)
Maida - 3 Tbsp
Black Pepper - 2 Tbsp (crushed/powdered)
Bread Crumbs - 1.5 Cup
Salt - as needed

Method


  • Wash the fish fingers and marinate in ginger garlic paste along with salt for 10 minutes.In a bowl get the egg whites separated .With the help of a mixer just beat it under pulse mode 4 to 5 times.And transfer the beaten egg whites to a bowl.Add required amount of salt ,chilli powder,pepper,maida and wisely mix with a spoon.


  • The batter should be thick and of flowing consistency.Add the spice batter to the marinated fish and mix well to ensure all the fillets are coated with the batter..Allow it to marinate for about to 20 to 40 minutes ,you can transfer the marination to the refrigerator.


  • Remove the marination from refrigerator.In a wide plate spread the bread crumbs and take single fish finger and coat it with bread crumbs and keep it a plate or box.


  • Repeat it for all the fish fingers.Once done it is ready to be fried.Or you could transfer the box closed with a lid, in the freezer section of your refrigerator and when needed you can immediately fry .


  • No need to thaw them before frying.


  • Serve with tomato sauce/ketchup.

Tip

  • While frying do not keep the flame in high ,just try to keep the flame in low-medium one for the even colored and well cooked fish fingers.
  • While coating with breadcrumbs try to give a press with your fingers to the pieces so that the breadcrumbs would tightly catch the batter,this will help the breadcrumbs not coming out while frying.
  • Chilli powder can be increased o decreased according to your taste buds.Can also you kashmiri chilli powder.
  • Mine was two full fillets which weighed 600 gms approx,if you are using lesser quantity of fish reduce the ingredients accordingly.
  • Instead of breadcrumbs coating i tried crushed oats and cornflakes coating which also turned out to be so crispy but little bit harder than the breadcrumb ones.I missed to click those pieces.If you wish you could give it a try for few pieces.

Read More..