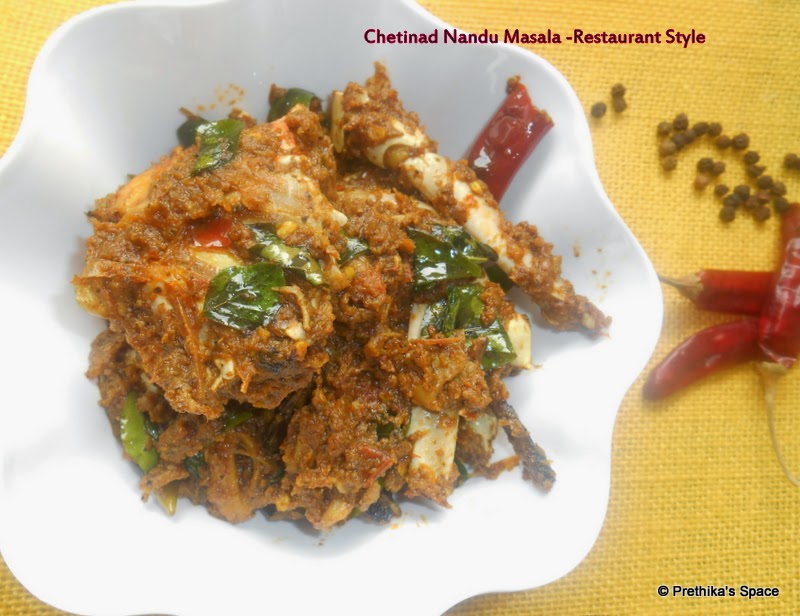
Chetinad Crab / Nandu Masala - Restaurant Style

Its been a long time i made nandu/crab at home.This time i planned to make a restaurant type masala at home,and to my goodness for the very first time i tried a new recipe of my own and it came out well.I felt so happy that my own recipe, won the appreciation of all at home.So sharing my own recipe here.


If you find this interesting ,please try it out,and am definitely sure ,you will like this recipe.Please don't forget to drop your beloved feedback ,which will encourage me in further steps.


Ingredients


Serves 3


Crab - 250 g
Coconut Milk - 4 Tbsp
Red Dried chilli - 2 no's
Green chillies - 2 no's
Cinnamon stick - 2 no's ,each 1"
Water,Oil,salt -as reqd
Curry Leaves - few 

For Spice

Red Dried Chilli - 1 no(Depending on the spice requirement)
Pepper - 1.5tsp
Jeera - 1 tsp 
Saunf - 1/2 tsp
Curry Leaves - few

For Masala

Big Onion - 1no medium sized
Tomato - 1 no big

Method

    Pre-preparation


  • Wash and marinate the crab with turmeric powder,salt and vinegar(optional) for atleast 30 minutes.

  • In a kadai add some oil and toss with ingredients under For Spice.Let it to cool by transferring it to a wide bowl or plate.This is to be grinded.


  • In the same pan add again 1 tsp of oil and saute sliced onions and saute until cooked.Then add chopped tomatoes and cook for atleast 3 to 4 minutes in medium flame.Turn off flame.Let them cool.


  • In a mixer add the spice ingredients and grind well .Then add little amount of water and add the cooled onion and tomatoes and grind well.The paste should be so smooth.


  • In the same or another kadai add some oil and temper with green chillies,cinnamon stick and red chilli .Then add the paste and saute for a while,or until the raw smell goes off.Then add the cleaned Crabs and saute them.


  • Add some water and water to the crab ,until it is immersed well.Close the kadai with a lid and allow to cook.Once all the water has been evaporated add some oil at this stage ,to enhance the flavor.Stir well.


  • Now add the thick coconut milk and once the gravy looks like a semi-gravy consistency add curry leaves .Give a mix ,Switch off the flame.


  • It is ready to be served.Goes well with Idly,Dosa,Rasam,Curd rice and even plain rice.
Read More..

Sirukizhangu Poriyal / Chinese Potato

Sirukizhangu ,a rare root variety vegetable is available only during pongal season, i.s during the month of december,january. It's has a peculiar flavor and taste.Before it was mostly available in village markets but in recent years its allover available in all city markets too.


Ingredients

Sirukizhangu - Handful / 250 kg
Sambar Powder - 1 tsp
Salt - as Reqd

To Temper

Oil - 1 tsp
Mustard seeds - a pinch
Curry Leaves - Few


Method

  • Soak the sirukizhangu in water atleast for half an hour.Wash thoroughly under tap water to remove the sand and other dirt.Using a peeler remove the outer skin and keep them in a bowl.And finally after peeling off the skin of all the small potatoes,wash them again ,once,and chop the roots.

  • In a pan add oil and temper with mustard and curry leaves.Add the chopped roots and stir fry them .Add salt after sauting for a minute.And Add some water ,just to immerse the chopped roots.Close the pan with a lid and saute until cooked.
  • Finally add the sambar powder and stir them well.Switch off flame once done.
  • Serve hot.


Read More..

Mutton Briyani

Weekend is yet to arrive,most of the people make their special menu's on weekend's only,because it means like a get together with family members.So special menu's carry on during weekends.Here is a such special recipe which i every people love.Ya it's a biriyani...Over from pizza mania ,now the trend has changed to biriyani mania...Biriyani is always a special food for Indian's.Varying from Kashmir to Kanyakumari there are different varieties of biriyani's or pulav's.Each regions method of making biriyani varies from the other region.But the unique thing is, its overall flavor attracts everybody.

Do you know why people love biriyani's? Its a yummy platter of perfectly done done rice blended with spices and veggies/meat.India is well known for its spices allover the world.Whatever meal we make spices play a vital part in bringing up the flavor and taste. Briyani is a one such food ,or we say a masterpiece of-course..Shall we lookout how my biriyani has come out ...


Making biriyani has always been so exciting to me. The Wonderful portion in making biriyani's to me is marinating..I love marinating.Each time i prepare fresh masala's for making biriyani's.The method which i have mentined for making this mutton biriyani is the same for chiken/veg briyani .For veg briyani's you can omit the marination part.If you prefer ready made masala's for making biriyani's,for a change, you can try out this fresh masala part ...It is interesting to take part in all the process of making a briyani.And i'm sure you will like it..


Ingredients

Serves 2 -3

For Marinating

Mutton - 250 g
Fresh Curd - 2 Tbsp
Slit Green Chillies - 2
Ginger-Garlic paste - 2tsp
Saunf powder - 1tsp
Pudhina and coriander leaves - few
Turmeric powder - 1tsp
Salt - as Reqd


For Pudhina Paste

Pudhina - less than a handful measeurement
Coriander Leaves - Half the quantity of pudhina measurement
Saunf Seeds - 2 tsp
Green Chillies - 2 (depending upon your spice requirement)


For biriyani

Rice - 250g 
Bay Leaves - 2 no
Cinnamon Stick - 2 no's
Elaichi - 1 no
Annasi Poo - 1 no
Cloves - 2
Onion - 2 no's
Tomato - 1 
Green Chillies - 1 Slit length wise
Fresh Curd - 1.5 Tbsp
Lemon Juice -1/2 tsp
Oil - as reqd
Ghee - 4 tsp
Turmeric powder- 1/2 tsp
Garam Masala Powder - 1 tsp (if home made, 1/2 tsp if store brought one)
Pudhina and Coriander Leaves - few
Salt - as Reqd


Method


  • First comes the marination part.Wash the mutton with vinegar (optional) and water.Wash them thrice with water.Then add all the ingredients under marination part and leave aside for atleast 1/2 hour.Once marination is over pressure cook them for minimum of 15 whistles or until the meat gets cooked.


  • Next is the fresh masala grinding part.It is so simple to make.In a pan add some oil and saute with the ingredients under pudhina paste.Allow them to cool and grind.Keep aside the ground masala.


  • Now you can check the pressure cooked meat and strain the water from the meat. Don't discard the water,reserve them.In a bowl add the rice and wash them once with water and completely strain the water.In a pan add some ghee and saute the strained rice.


  • Saute the rice well and remove from stove and keep aside.In a pressure cooker or in a kadai add some oil/ghee and add the spices(bay leaves,cloves,annasi poo,cinnamon and elaichi) saute them for a minute under medium flame.Then add the sliced onions and saute them well ,for 3 to 4 minutes under medium flame.


  • Then add the grind pudhina paste and saute them well .Add some oil if required at this stage.Then add some turmeric powder,little bit of garam masala and salt.Then add the tomatoes.Saute until the tomatoes are well cooked.


  • Next add the cooked meat and saute for atleast 4 minutes.Then add curd and pudhina leaves mix well and add the reserved water.Measure the water and add to the pan.For 1 Cup rice add 1.5 Cup water including the reserved water.


  • Once the water starts boiling add the fried rice and check to the salt and spice level now.(If you feel to add more spice you can add chilli powder at this stage,But its completely optional, to add chilli powder.I generally prefer only green chilly flavor.)Add the remaining garam masala at this stage and squeeze 1/2 tsp of lemon juice and close the cooker.Wait for 2 whistles and open the lid once the pressure is released and mix the briyani with a ladle.


  • Serve hot with onion raitha and salna.Enjoy!!!


Read More..

StrawBerry Yogurt IceCream-


The summer season has just begun.March is a very good and exciting month for me during school days :) because only by march end we get annual leaves and during my school days March month will be a mixed month of expressing tensions,fear :) and happiness.Tensions just come because of the exam fever and happiness ,obviously due to the annual holidays...Those days are always memorable to everyone i believe. I would like to mark this summer season with a cool recipe to vent out the hot breeze.My recipe here is not only to welcome the summer,and thers's a one more event behind this cool pink post is ..... please scroll down to know the special thing about this post...


Yummy strawberry yoghurt ice cream 


This is a very simple recipe which you can make with available ingredients at home.Its a 100% vegetarian recipe.


Ingredients

Yogurt - 1 Cup
Fresh Cream - 100ml
Fresh Strawberries - 5 to 6
Sugar - 3/4 Cup (adjust according to your taste level)


Method


  • Take the fresh strawberries,wash and place them in your mixer along with that add the sugar.Grind them well.


  • Once done you can check to the sugar level if you feel sugar level is less you can add extra sugar according to your need.Add the yoghurt and fresh cream and grind well in mixer.


  • Transfer them to a freezer safe bowl and keep in freezer for atleast 30 hour.


  • After half an hour take out the icecream mix from freezer and beat them in mixer again and keep them back in freezer for half an hour similarly repeat this beating process atleast 4 times and keep them in freezer to set.Minimum it might take 8 hours to set.


  • After it is completely frozen serve them in individual bowls and enjoy the strawberry yogurt icecream..


Note :


  • Yogurt should be thick .instead of yoghurt you can use Mishti doi also which gives an extra rich taste. I have tried with Mishti doi also(Mother Diary Mishti Doi brand)
  • While allowing the ice cream to set in freezer close them with lid and place under freezer.
  • For extra fresh flavor you can add chopped strawberries after the final process of blending in mixer and set them ,it tastes damn good.
Read More..

Urad Dall Fritters/South Indian Uzhuntha Vadai - Step by Step


This is a very famous south Indian street food,where you can find in every nook and corner's of the main places in south india,esp Tamilnadu.It is a best served evening snack ,very healthy too.Because urad dall has the benefit of giving strength to back bones,particularly it is recommended for women's health.Every kid likes fried stuff's and here is the one that most attracts the kids and of-course it's a healthy food too.Here am sharing the secret of a fluffy crispy urad dall.

To get yummy urad vada's just grind them in your wet grinder's rather than using mixer's.By the way of grinding in wet grinder's you can yield even more fluffier vada's compared to that using mixer's.So the next time when you use your grinder's for making idli/dosa batter's soak this urad dall in advance and grind them and see the magic you get.


Ingredients 

Urad Dall - 1Cup
Green Chillies - 2 to 3
Small Onions - 1/2 cup
Jeera seeds - 1tsp
Ginger - 1" inch stick
Curry Leaves - few
Asafoetidia - a pinch 
Salt - as reqd
Water - as reqd
Oil - to fry

Method


  • Soak the urad dall with required amount of water and leave them for atleast 1hour.Then strain the entire water and keep aside,meanwhile keep grinder ready .


  • Add the strained dall and grid them by adding water little by little ,dont add water all at once.Until you get a fluffy batter grind them.Process might take atleast 20 minutes.


  • Meanwhile chop green chilies,ginger and small onions.Once the batter is ready remove from the grinder.Mix salt,asafoetidia and the chopped items along with the batter and mix well.Take a polythene sheet,preferably milk packets.In a small bowl have some water,which is required to spread on the polythene sheet before shaping vada's.Apply some oil to the polythene sheet.


  • In a kadai add oil and let them heat.Once the oil has reached the particular temperature(if you drop a small pint of batter the battered ball should hit the bottom of the kadai and should immediately rise up) pinch a small portion from the ready batter and spread on the polythene sheet and gently make a hole in the center and carefully reverse the polythene sheet towards your fingers.Ensure your fingers are dipped in water and wet before transferring ,so that the vada may get easily flipped to the boiling oil.


  • Fry them in Med-High flame and turn them when the one side looks cooked/golden brown.Remove from oil and place them in a tissue to remove the excess oil.


  • Serve them hot with coconut chutney...Yummy vada's are ready


Read More..